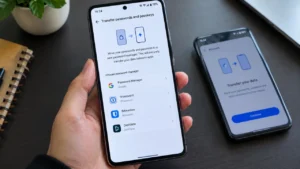
Switching to a new password manager can feel like a bigger job than it really is. Your saved passwords, login details and passkeys are usually spread across dozens or even hundreds of apps and websites, so moving everything manually isn’t practical.
Android has now made this process much easier. You can transfer passwords and passkeys directly from one supported password manager to another without first downloading your credentials into an unencrypted file.
If you are planning to move from one password manager to another, here’s how the new Android transfer process works and what you should know before starting.
Also read: How to Use Google’s New Android Features From the September 2026 Update
What Is the New Password Manager Transfer Feature on Android?
Android now provides a built-in way to move passwords and passkeys between compatible password managers.
Previously, moving passwords often meant exporting them into a CSV or another file and then importing that file into the new service. While that method still exists, it can leave sensitive login information exposed on your device if the exported file is not deleted properly.
Passkeys were even more difficult to move because they could not simply be transferred like regular passwords.
With the newer Android experience, the two password managers can work with Android to securely coordinate the transfer.
You don’t have to manually download a password file first.
What Can You Transfer?
The new process can transfer:
- Saved passwords
- Passkeys
- Login information supported by the participating password managers
Android handles the transfer between compatible credential managers, while you remain in control of which password manager is used as the source and destination.
Google says the experience is currently available with Google Password Manager, 1Password, Bitwarden Password Manager and Dashlane, with additional partners expected to support it over time. The feature works on Android 8 and newer devices.
How to Transfer Passwords and Passkeys to a New Password Manager
The exact names of buttons can vary slightly depending on the password manager you’re using, but the basic process is straightforward.
Step 1: Install Your New Password Manager
First, install the password manager you want to switch to on your Android phone.
Sign in or complete the initial setup so the app is ready to receive your passwords and passkeys.
Don’t uninstall your old password manager yet.
You may still need it to authorize the transfer.
Step 2: Open the Import Option
Open your new password manager and look for an option such as:
Import passwords
or
Import passwords and passkeys
The location of this option depends on the password manager.
When the app supports Android’s new transfer system, it will hand the transfer process over to Android.
Step 3: Choose Your Old Password Manager
Android will check which compatible password managers are installed on your phone.
You’ll then see the password managers that can be used as a source.
Select the password manager where your existing passwords and passkeys are currently stored.
Step 4: Sign In to Your Old Password Manager
Android may take you to your existing password manager so you can authenticate the transfer.
Depending on the service, you may need to unlock the app, enter your password or use your fingerprint or another security method.
If you’re transferring passkeys, the old password manager may also ask for additional verification, such as a recovery key.
Step 5: Review and Approve the Transfer
Before the transfer starts, review what you’re about to move.
Once you’re satisfied, authorize the export from your old password manager.
Android then coordinates the transfer between the two password managers.
The process is designed to happen directly between the apps rather than requiring you to create an exposed password file first.
Step 6: Wait for the Transfer to Finish
The actual transfer should normally take only a short time.
Once it’s complete, open the new password manager and check a few of your important accounts.
Try searching for:
- Your email account
- Banking or financial accounts
- Social media accounts
- Frequently used websites
- Important passkeys
Don’t delete the old password manager until you’ve confirmed that your important credentials are available in the new one.
Do You Need a Screen Lock?
Yes, Android requires a screen lock for password and passkey transfers.
Your phone may ask you to verify yourself using your PIN, password, pattern or biometric authentication before allowing sensitive credentials to be imported or exported.
If you don’t currently have a screen lock, Android may ask you to set one up before continuing.
What If Your Password Manager Doesn’t Appear?
Don’t worry if you don’t see your old password manager in the list.
The new Android transfer experience depends on support from the password manager itself. Google says more password-manager partners are expected to support the feature over time.
You can try these things:
- Update both password manager apps.
- Make sure you’re signed in to the old password manager.
- Check that your phone has a screen lock enabled.
- Restart the phone and try again.
- Look for an import option inside the new password manager.
- Check the password manager’s own migration instructions.
If direct transfer isn’t supported, you may still be able to use a traditional import/export method.
Can You Still Use a CSV File?
Yes.
Traditional CSV import and export is still available for supported password-manager workflows.
For example, Google Password Manager supports importing passwords from a CSV file. On Android, you can go to Chrome → Settings → Autofill and passwords → Google Password Manager → Settings → Import passwords and passkeys. You can then select the CSV file and import it.
However, CSV files can contain passwords in readable form, so you should treat the file as highly sensitive.
Delete the CSV file from your phone immediately after a successful import.
Anyone who can access that file could potentially see the passwords stored inside it. Google specifically recommends deleting the exported password file after importing it.
What About Passkeys?
Passkeys work differently from traditional passwords.
Instead of relying on a password that you type, a passkey uses cryptographic credentials and your device’s screen unlock or biometric authentication.
Android supports passkeys through Google Password Manager and compatible third-party password managers. You can also choose which password manager handles your passkeys from:
Settings → Passwords, passkeys & accounts
The exact wording can vary depending on your phone.
The new transfer experience is particularly useful here because it can move supported passkeys along with passwords instead of forcing you to recreate them one by one.
Don’t Delete Your Old Password Manager Too Quickly
This is one of the most important things to remember.
After transferring your credentials, keep your old password manager installed for a while.
Check whether:
- Important passwords are present
- Passkeys appear correctly
- Autofill works
- Your most-used accounts can sign in
- There are any missing entries
- Duplicate passwords were created
Google notes that duplicate passwords imported into Google Password Manager aren’t added again, but migration behavior can vary between password managers.
Once you’ve confirmed everything works, you can remove the old password manager or disable it as your autofill provider.
How to Check Which Password Manager Android Is Using
If you have more than one password manager installed, Android lets you choose which one should be used for passwords and passkeys.
Open:
Settings → Passwords, passkeys & accounts
Then select the password manager you want to use.
On some phones, you can simply search for Password Manager in Settings to find the relevant option.
This is useful after migration because it makes sure your phone isn’t still trying to autofill credentials from the old service.
Is It Safe to Transfer Passwords Between Password Managers?
The new Android transfer system is designed to make migration safer by avoiding the need to create an unencrypted password file during the supported transfer process.
Still, you should only transfer credentials to a password manager you trust.
Your password manager contains some of the most sensitive information on your phone, so avoid installing unknown apps simply because they claim to offer password migration.
Google also recommends making sure you trust the third-party password manager before importing or exporting passwords and passkeys.
What Should You Do After Moving Your Passwords?
Once the migration is complete, take a few minutes to clean things up.
Check your most important accounts
Start with email, banking, social media and other accounts that you use frequently.
Turn on the new password manager’s security features
Enable biometric unlocking, PIN protection and any available security alerts.
Check for weak or compromised passwords
Many password managers can identify passwords that are weak, reused or exposed in a data breach.
Google Password Manager also provides a Password Checkup feature for reviewing potentially unsafe passwords.
Disable the old autofill service
If you’re finished with the old password manager, make sure Android isn’t still using it to fill passwords and passkeys.
Keep your recovery information safe
If your new password manager provides a recovery key or emergency recovery option, store it somewhere secure.
Don’t keep the only copy in an easily accessible text file on your phone.
Also read: How to Check Which Apps Are Using the Most Mobile Data on Your Android Phone
Final Thoughts
Moving to a new password manager on Android no longer has to mean exporting a huge list of passwords and manually rebuilding your passkeys.
With Android’s newer transfer experience, compatible password managers can securely move passwords and passkeys between apps with just a few steps. The feature is especially useful for people who want to switch password managers without dealing with sensitive CSV files.
If your password manager supports the new Android transfer system, it’s worth using that option first. And if you have to use a CSV file instead, remember to delete the file as soon as the migration is finished.
The most important thing is simple: don’t remove your old password manager until you’ve confirmed that your important passwords and passkeys are working correctly in the new one.